 This little trick goes back to my 6th grade year. I started at a new school that year, and my first friend there was Therese. She asked me if I liked Nirvana or Green Day better ( NIrvana, DUH.) She was really into Gwen Stephani. Her mom bleached her hair white, and she wore a little bindi on her forehead. When Gwen wore a bun to an awards show, T got a bun form and we thought that was the coolest thing ever for a while.
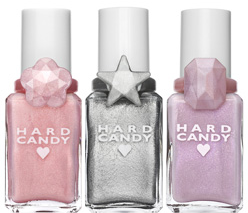
Then came Hard Candy nail polish. The perfect pastel colors and a little sparkly plastic ring that came with it? God I loved that stuff. It was 12$ though, and I really couldn’t afford it. I stuck with Wet n wild but T let me use her Hard Candy colors. We would bring our nail polish to school and paint our nails with our hands under our desks so our teacher wouldn’t see.
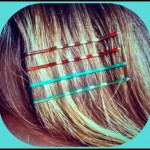
When that got old, we painted our bobby pins. Why not have sparkly and colorful bobbys? In honor of being a 12 year old, I am pulling this little crafty trick out of the back pocket of my JNCO jeans to share with you.
We spend so much time here at HTHG trying to hide our bobbys in our hairstyles. Here is your chance to make a statement with bobby pins, and wear them proudly.
For this little project, you will need some bobbys (I like to use big ones and little ones.) You will need nail polish in whatever colors you desire. I like Sinful Color polish. I get it at Walgreens. Lastly, you will need a piece of card board or card stock.

Pin your bobbys to the cardboard. Apply the polish to the smooth side of the bobby (The wavy side goes against the head) Let it dry, then do another coat. If you want, you can do a sparkly coat too. Let them dry. Now use them to accessorize your hairstyle! I will be doing a couple of DIY Friday tutorials soon that will show you fun ways of wearing your colorful bobby pins.
XOXO, HTHG

