 I know. Hair chalk has been around for a while now and I’m just now jumping on the bandwagon. This is only because I like to see a trend cool down before adding my own spin to it. I wanted to be able to give you guys something unique, so I waited. And played. And drew with chalk with my kids. And chalked their hair. And chalked my mannequin’s hair.
I experimented with different chalks. I started with KM Color.Bug ![]()
which is awesome but a little spendy and not exactly easy to use. Crayola chalk is cheap and it works alright, but it is a bit chunky and dry and doesn’t seem to have enough pigment in it to use on darker hair colors.
Finally, I went to the art store and got Prang Pastello Art Chalk (10440) which was relatively inexpensive and came in really pretty bright colors. I got a pack and brought em home and tried them. They were perfectly smooth and creamy and colorful in the hair.
Now, I know that there are companies out there that make chalk that is specific for hair. So far, though, I am perfectly happy with my tried and true sidewalk chalk. If you have a brand of hair chalk that you love, I’d love to know what it is!

Today, I am going to tell you how I use hair chalk for best results.
The first thing that you should know about hair chalking is that you are going to get your hands dirty. BUT, don’t worry. It washes off the hands just as easy as it washes out of the hair. 
Just add water and give a good scrub and rinse. To remove it from your hair, brush it out with a paddle brush to lighten it into a pretty pastel hue, and then rinse well with water to remove it altogether.
You can use hair chalk on all hair colors. Reds, pinks, purples, and oranges tend to work well on darker hair. All colored chalk works on lighter hair colors. Of course chalk shows up the best on very light hair.
Here is how I use it.
How to use hair chalk!
Select the colors that you want to use. Soak them in water. Test them before using in your hair. For best results, when you draw with them, they should be wet enough to leave a wet line along with the color. This will give you a more saturated color in your hair.
Start with dry hair. Choose your hair section to color. Hold the section with some tension. Firmly run the chalk down the hair in small feather-like strokes. It will be a little chunky at first. Don’t worry. After it dries, you can comb through it and it will even out.
Don’t be afraid to use 2-3 colors on one section! Color fades are so easy and they look great. Try doing the top third of the section with one color, then switch to another color for the middle third, and then another color on the ends.
Let the chalk dry in your hair, then gently comb through it with a comb or with your fingers. This will diffuse the color and smooth it out. Now, you are ready for styling!
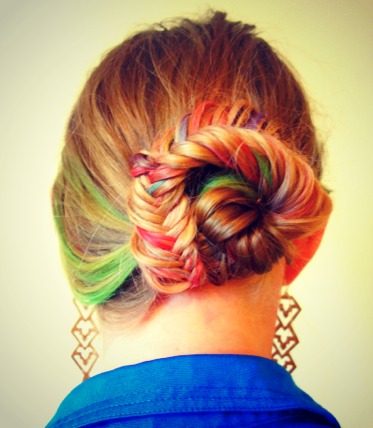
Here is a fun way to style chalked hair. I will call this the Parrot fish braid because it is a tropical colored fishtail braid.
1. To get this look, you will want to start by chalking 5-6 random sections of hair at different lengths with different colors. Chalk some pieces with solid color, and color fade a few too.
2. Do a fishtail braid and secure the end with a small elastic.
3. Gently pull your braid apart to bulk it up.
4. Wrap the braid to the right, starting at the base.
5. Pin it from a couple different angles to secure it. Make sure that the tail is tucked in.
Do you like this look? I’ve got some more fun and unique hair chalking up my sleeve so get your chalk ready. Also, do you love the earrings that the model is wearing in this tutorial? I do. Nikki made em.
XO! HTHG