 Valentine’s Day always makes me think of going lighter with my hair. Every year around mid February, I get the fever and start going blonder.
My hair lightening adventures have gone from drastic platinum to subtle ombre. As I get older and my hair gets longer, my hair motto has changed from ‘go big or go home’ to something more like ‘keep your eye on the prize.’ (The prize being long and healthy no maintenance hair)
I do miss my days as a hair swinger. Black to blonde and back again. Short, blue, long extensions .You name it. But I am enjoying the ease and femininity of longer more natural hair. I have given birth twice so I guess I feel like my hair better suits the fact that I have been officially confirmed as a woman. It just feels right.
So now that Valentine’s Day is behind us, my first official lightening of the year was a subtle ombre using bleach and 20v developer in my ends. Their are a million ways of doing DIY ombre hair, but the ponytail trick is by far my favorite. It creates perfect line-free light ends that look as natural as a So-Cal surfer chic. And that is where the trend started, am-i-right?
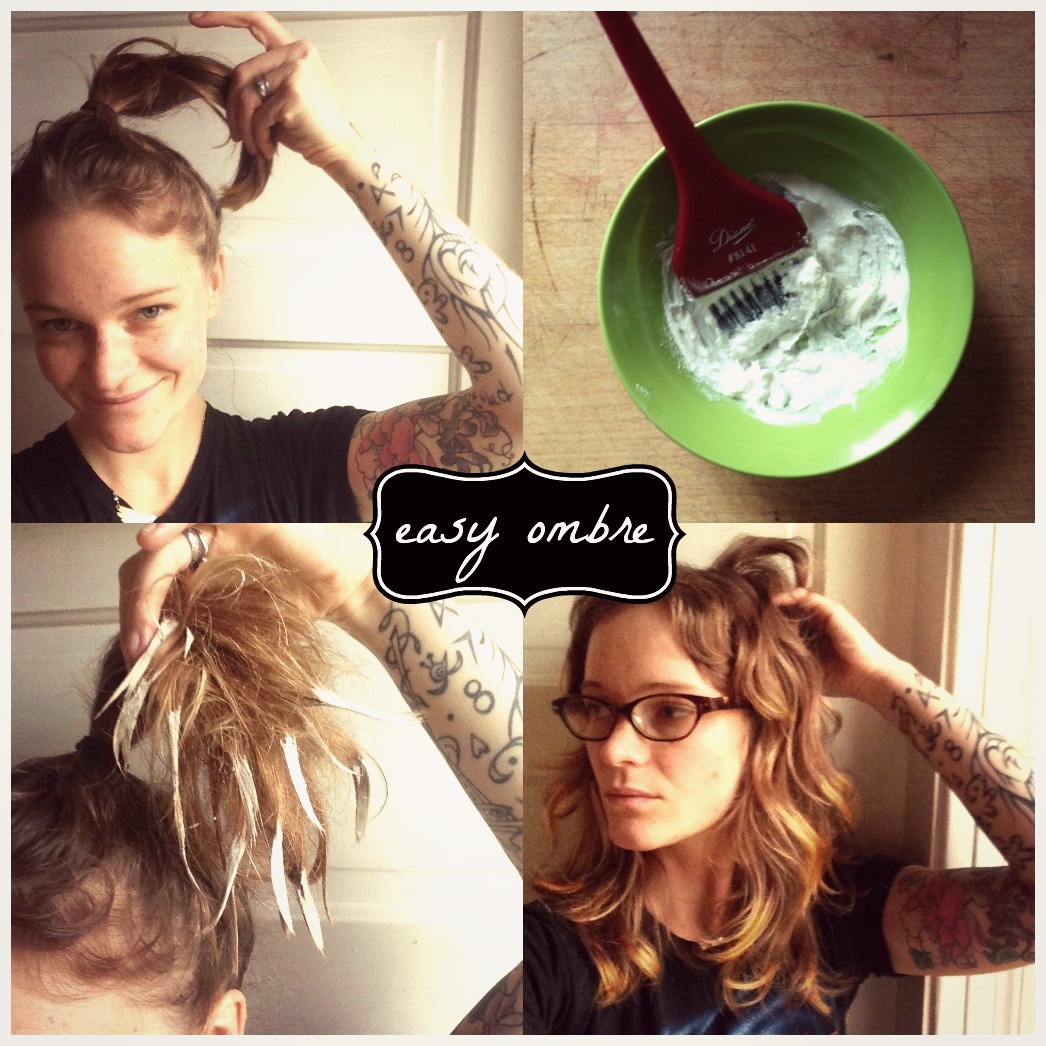
Ombre hair is genius. It is pure recession gorgeousness. It is so easy to DIY, it looks great, and it requires no maintenance. The ponytail ombre technique is awesome because depending on how much bleach and what volume you use, you can go subtle or drastic or dip-dye on short, medium, or long hair. Here is a full tutorial of this easy coloring technique.
I decided to go with super subtle color because I didn’t want to have to fuss about my dry ends later. So, I employed a bit of back combing to diffuse the color.
Here is how I did my DIY ombre hair.….
I started with bleach and developer, gloves, a comb, ponytail holder, and bowl and color brush, and a couple pieces of foil.
DIY subtle ombre hair

I began by putting the hair in a ponytail on top of my head. If your hair is short and won’t go entirely up into a pony, don’t worry about it. Just put as much up as will reach.
Now, I mixed up my bleach very thick and paste-y so that it doesn’t drip or bleed. It was just barely thinner than cookie dough.
Then I took a random chunk of hair from within the pony and back combed it 3 times. I applied bleach to the ends, gently massaging it through so that it thoroughly saturated and covered them.
I did this with 10 or so chunks of hair. This was mostly all of the hair, leaving out just a few random pieces.
*I used a little variation in how much of the ends I bleached. Just the very tips on a couple pieces, and a couple inches on others. My chunks were different sizes. I like to do very small chunks with longer bleached ends to add some ribbons of color. The great thing about DIY ombre is that the more random it is, the better it looks.
*If your ponytail is long, lay the bleached ends on a piece of foil to keep it out of the way. You don’t want the bleach on the ends touching the rest of the hair. The back combing helps keep the bleached hair from flopping onto the other hair.
When I was done applying bleach, I had a ratty mess of hair and some nice clean bleached tips. I let it process for 20 minutes or so. I took out the ponytail holder and washed the bleach out.
 I was completely pleased with the way it turned out. My hair looks like it was frosted with liquid sunshine. I’m feelin it. I sprayed it down with my favorite sea-salt texture spray when it was damp, scrunched it a bit, and let it dry into lovely surfer-girl ombre-d waves.
Will you try it? Don’t forget to send me a photo;)
 While we are on the subject of DIY hair, do you want more to know more tricks that will give you salon-approved hair at home ?check out HTHG’s DIY Video shop, featuring haircuts and color techniques you can do at home. You can even learn to cut your dude’s hair here!
 Have you considered going Shampoo-Free? I have been at it for 3 years. It completely changed my hair and my life;). Click here for my ShamPHree Journey and HTHG’s ShamPHree Shop.
If you are curious about DIY home-hair coloring, I highly recommend using DIY hair color by Madison Reed, which Resorcinol-Free.
If you purchase a Madison Reed Radiant Color Kit, you will receive not only the colors of hair colors your choice, but also the necessary tools to apply it. The entire line is designed for the DIY hair colorer! And if you need to tone in between coloring, be sure to check out their Color Reviving Gloss to refresh and revive your hair.
Also, I recommend a shopping stop at Beauty Store Depot for all your other DIY hair cutting and coloring tools to fill your toolkit!
Need a custom DIY hair color consultation to help troubleshoot your hair color at home?
 $30 buys you a one-on-one online consultation with HTHG regarding your color and how to get it where you want it. Click here.
XOXO, HTHG